Congratulations on purchasing the YakAttack TowNStow BarCart Kayak Cart. After 18 months of intense development, the YakAttack design team has truly redefined the kayak cart category. Combining best-in-class quality and durability with never-before-seen features and functionality, the TowNStow BarCart is one of the most highly engineered and versatile products we’ve ever produced! Designed for extreme duty, the BarCart is universal, collapsible, user-friendly, and robust, requiring no tools to assemble or disassemble. Nothing about this design is what you’d expect, but your expectation will never be the same after using it. This page combines all of the information included with your kayak cart and also includes all of the videos from our Quick Start playlist. To get set up, follow the instructions below, watch the Quick Start videos, view the fitment guide, and, as always, feel free to reach out to us at 434-392-3233 or support@yakattack.us if you have any questions.
The TowNStow BarCart is a heavy duty, highly engineered, and very versatile kayak cart, designed for transportation over long distances at walking speeds. It is not designed to be towed by any other means, including motor vehicles, ATVs, bicycles, or any method that can exceed 5 miles per hour.
MAINTENANCE
The TowNStow BarCart requires very little maintenance, but to maximize its performance and longevity, we recommend cleaning and lubricating the wheel and hub assemblies annually, or about every 20 miles, with a grease that does not react adversely to plastic, such as a silicone grease.
INITIAL SETUP
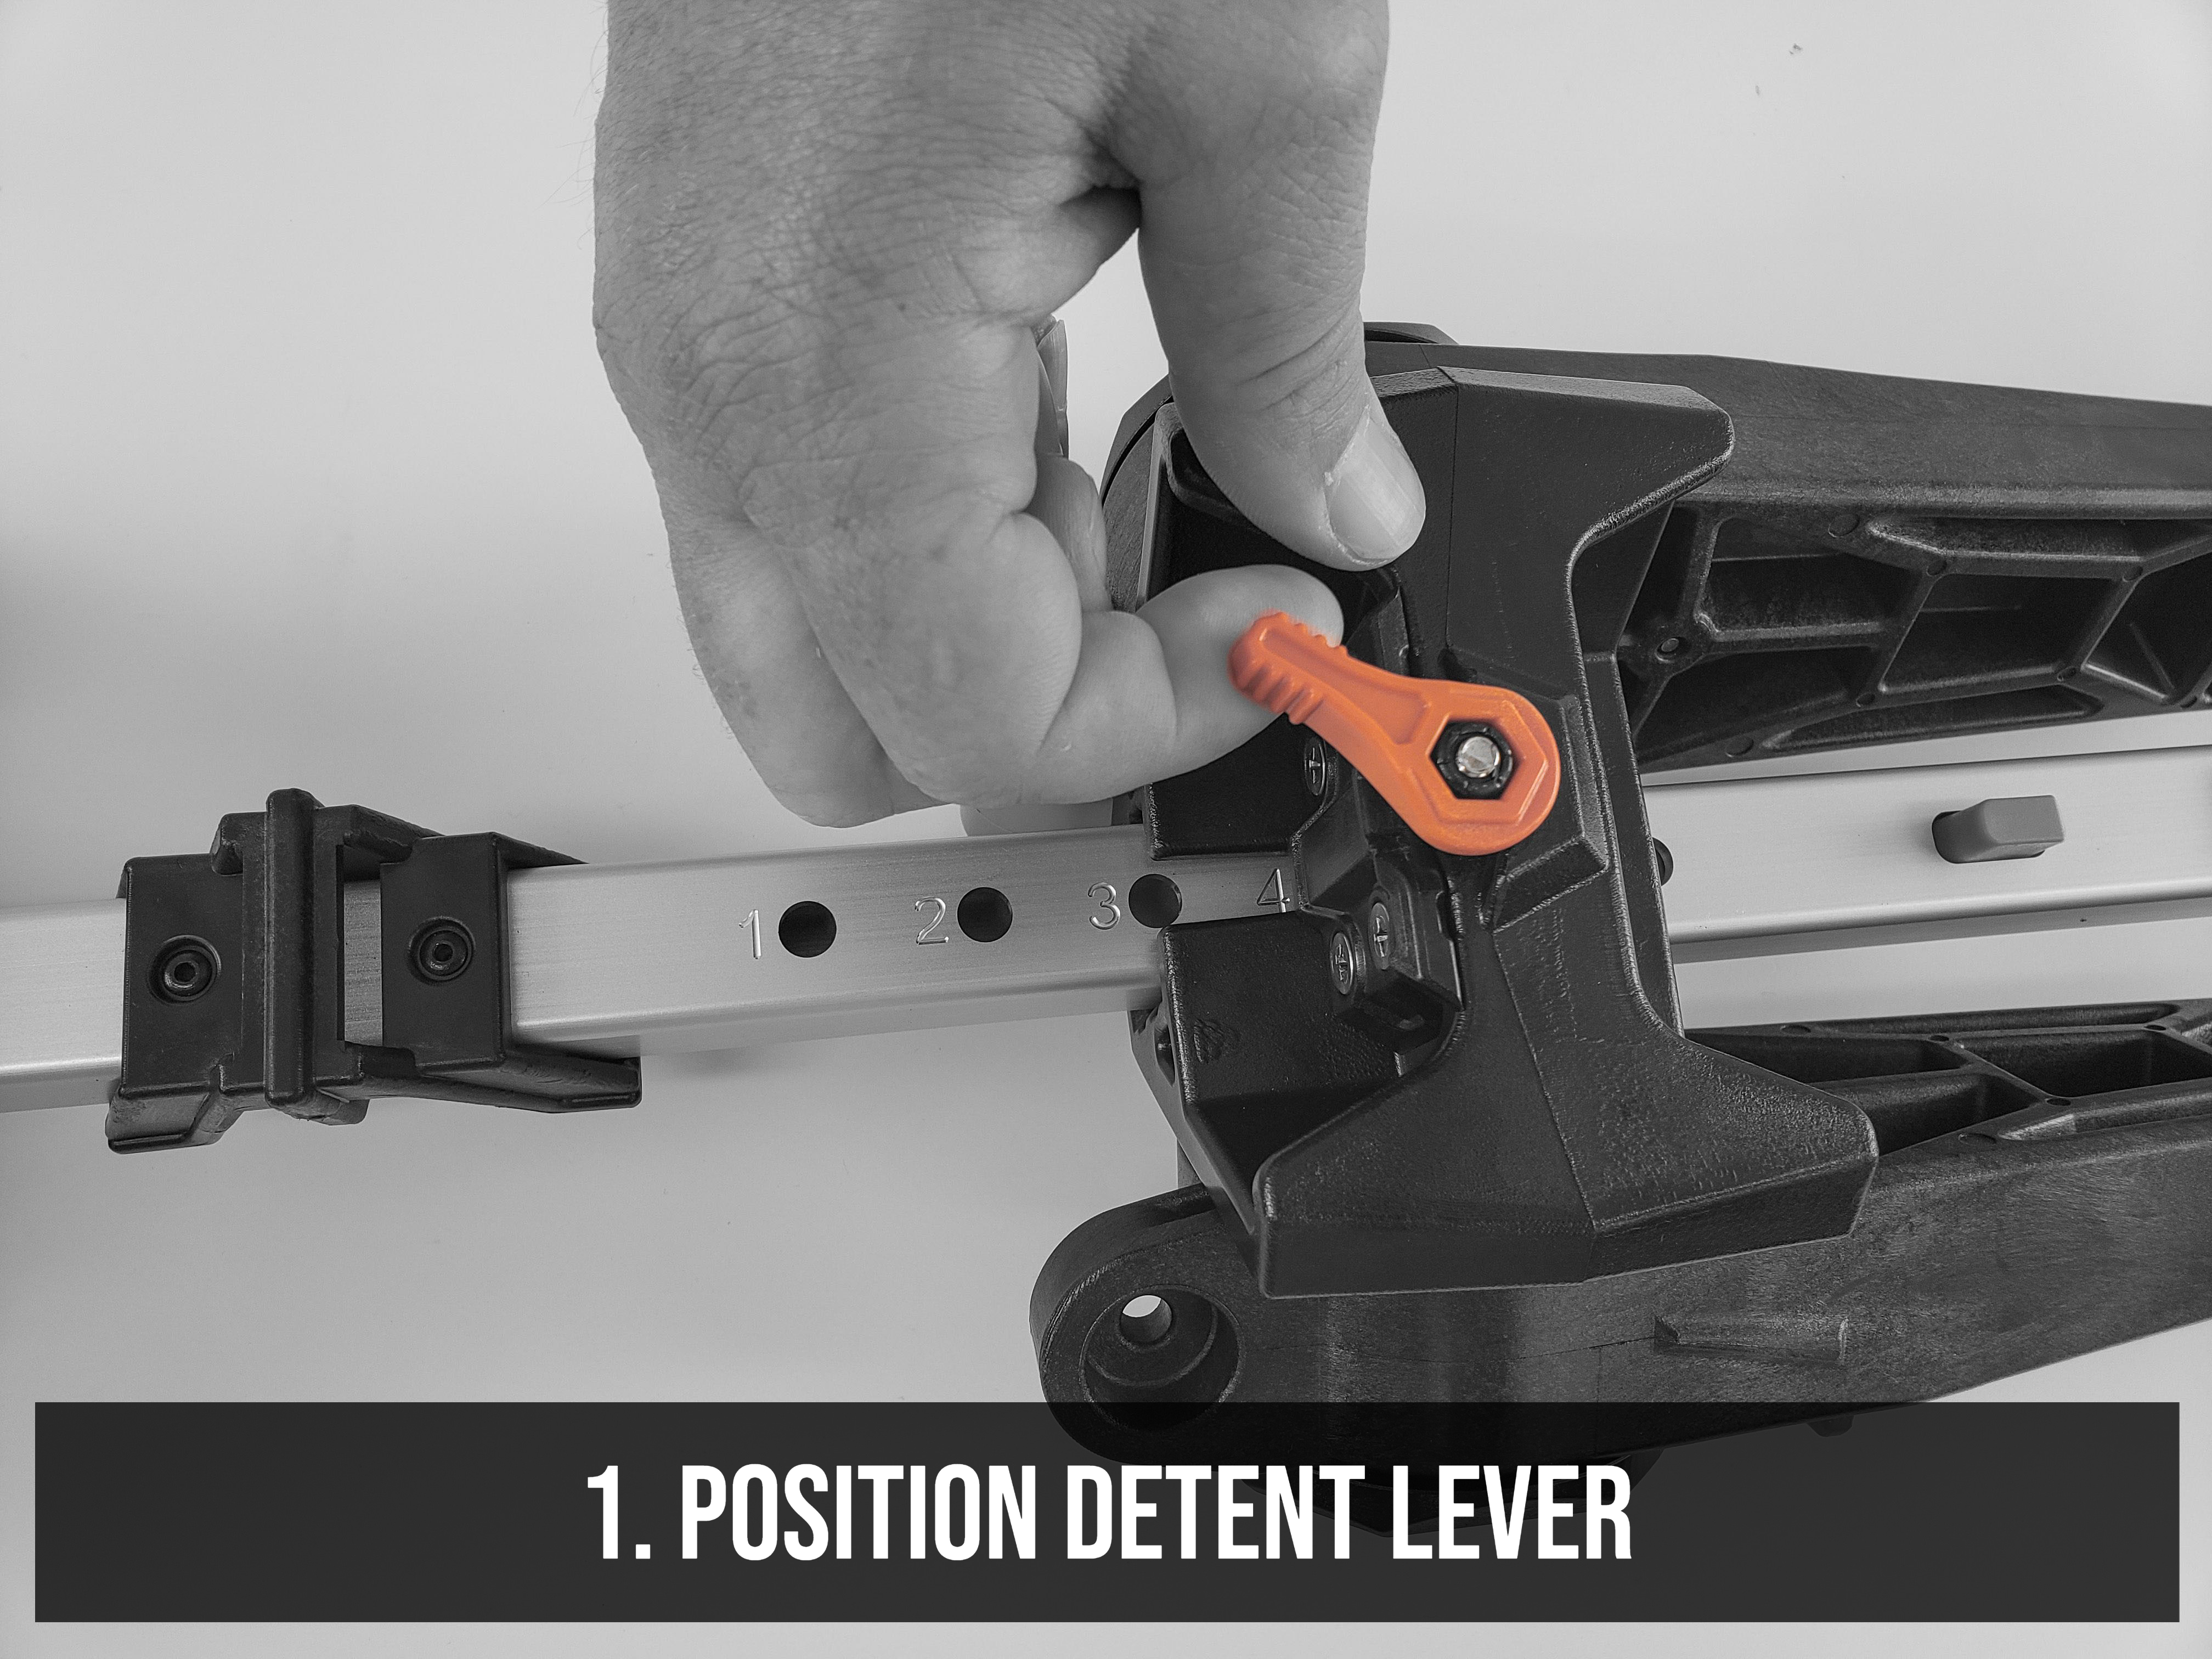
1. Remove the axle assembly from the box. Set the chassis bunk width to the standard position (hole #4) and lock in place, using the ORANGE Position Detent Lever on the top of the chassis.

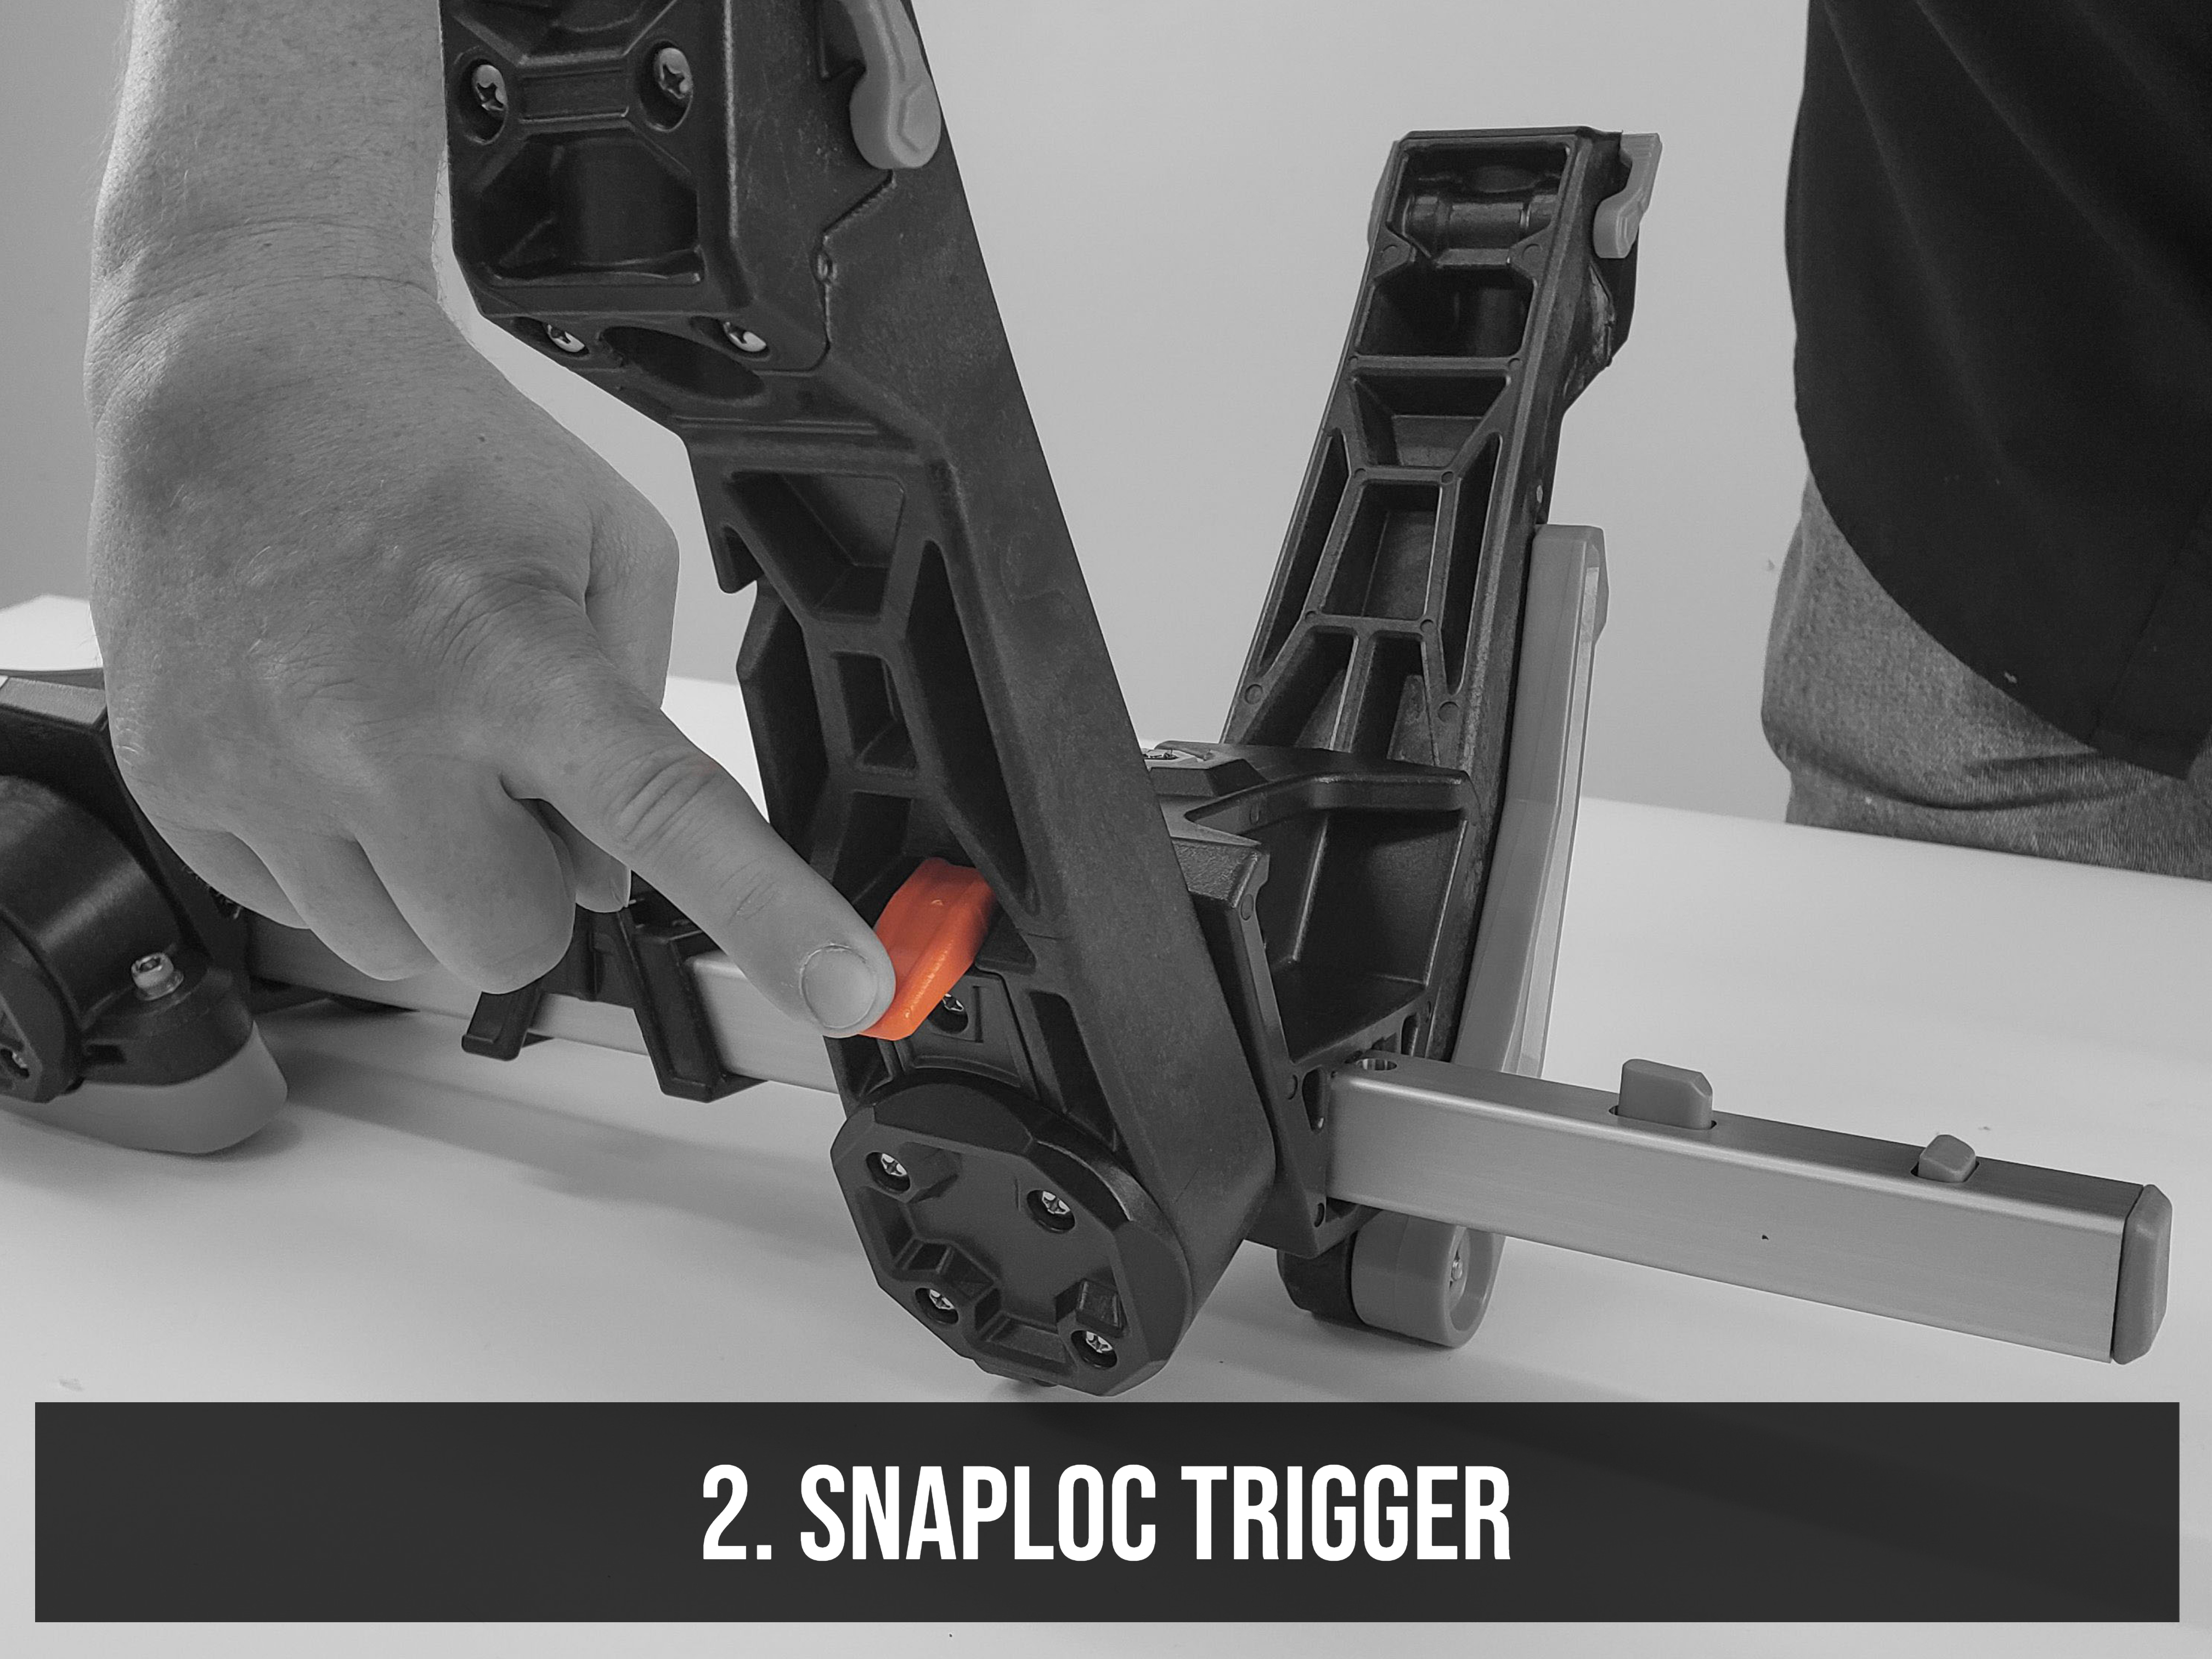
2. Deploy the upright arms. First, unlock the upright by retracting the ORANGE SnapLoc Trigger. Next, rotate the upright into its deployed state. Lastly, engage the SnapLoc Trigger to secure the upright in its deployed position. Repeat for all four uprights.

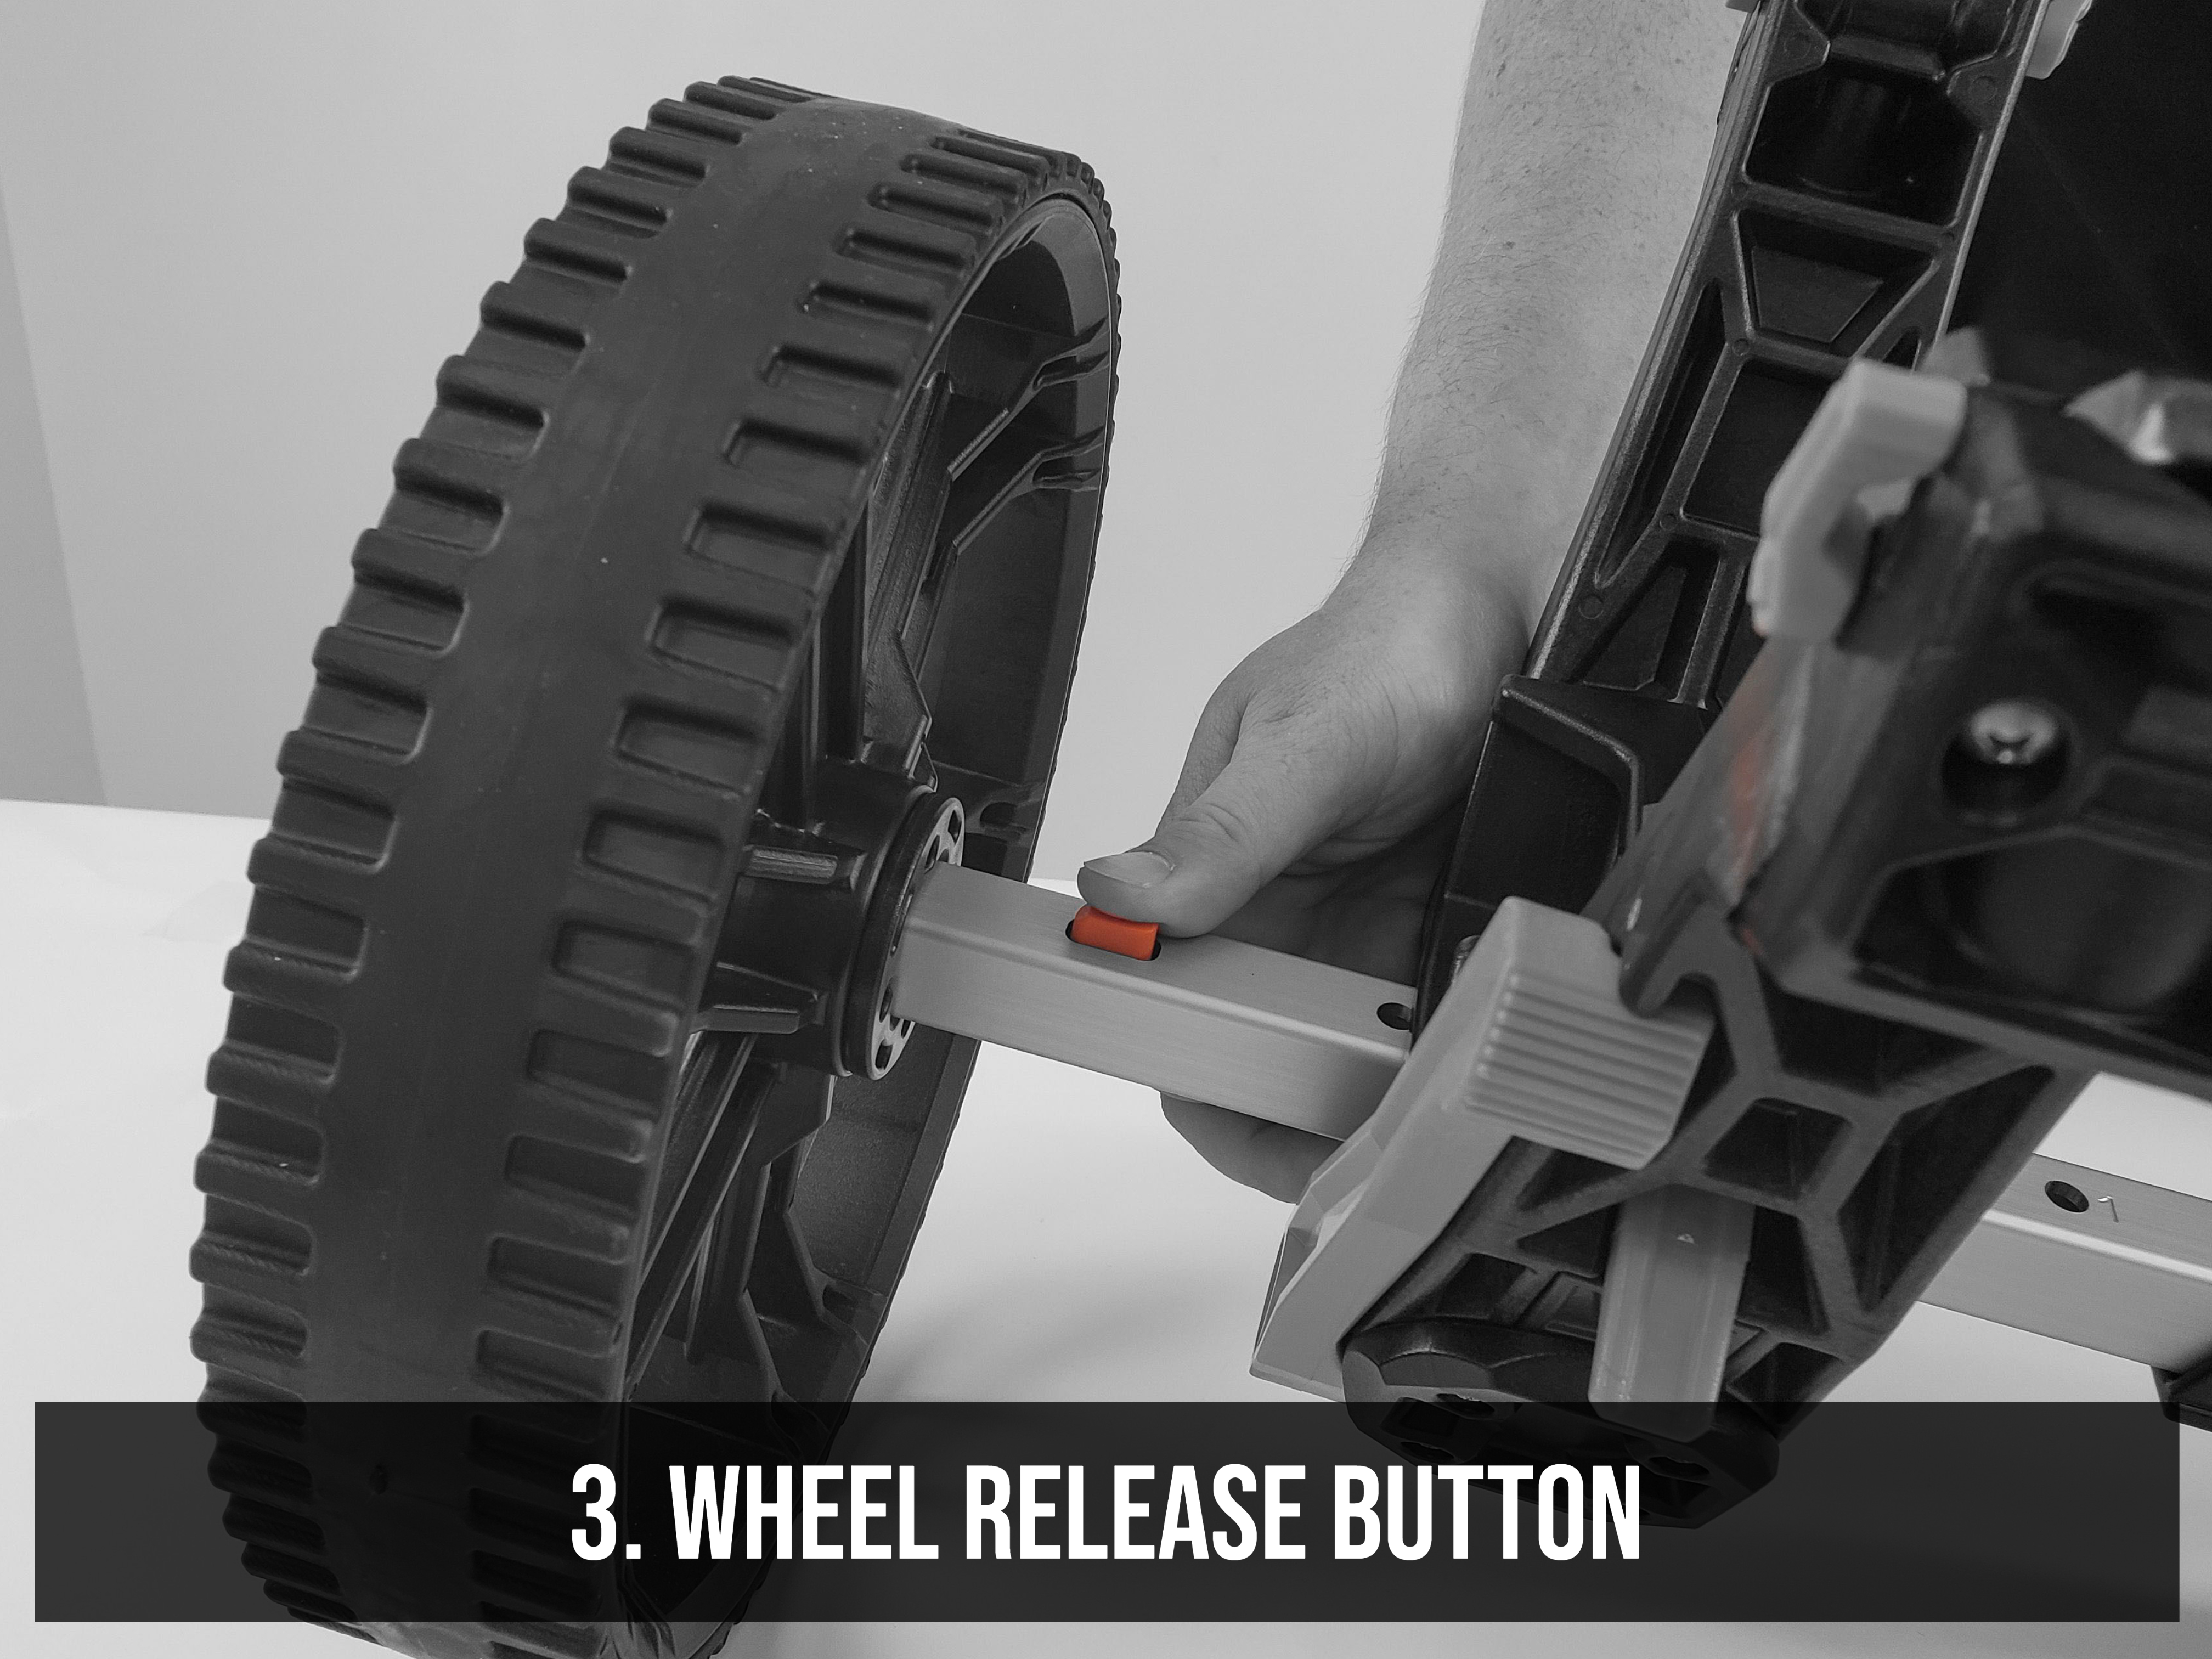
3. Attach the wheels. Align the square axle receiver in the hub with the axle, paying attention to the orientation of the tie down slot integrated into the end of the hub. Slide the hub onto the axle until the hub retainer snaps into place, securing the wheel and hub to the axle. To remove the wheels, press down on the ORANGE Wheel Release Button behind the wheel hub and pull.

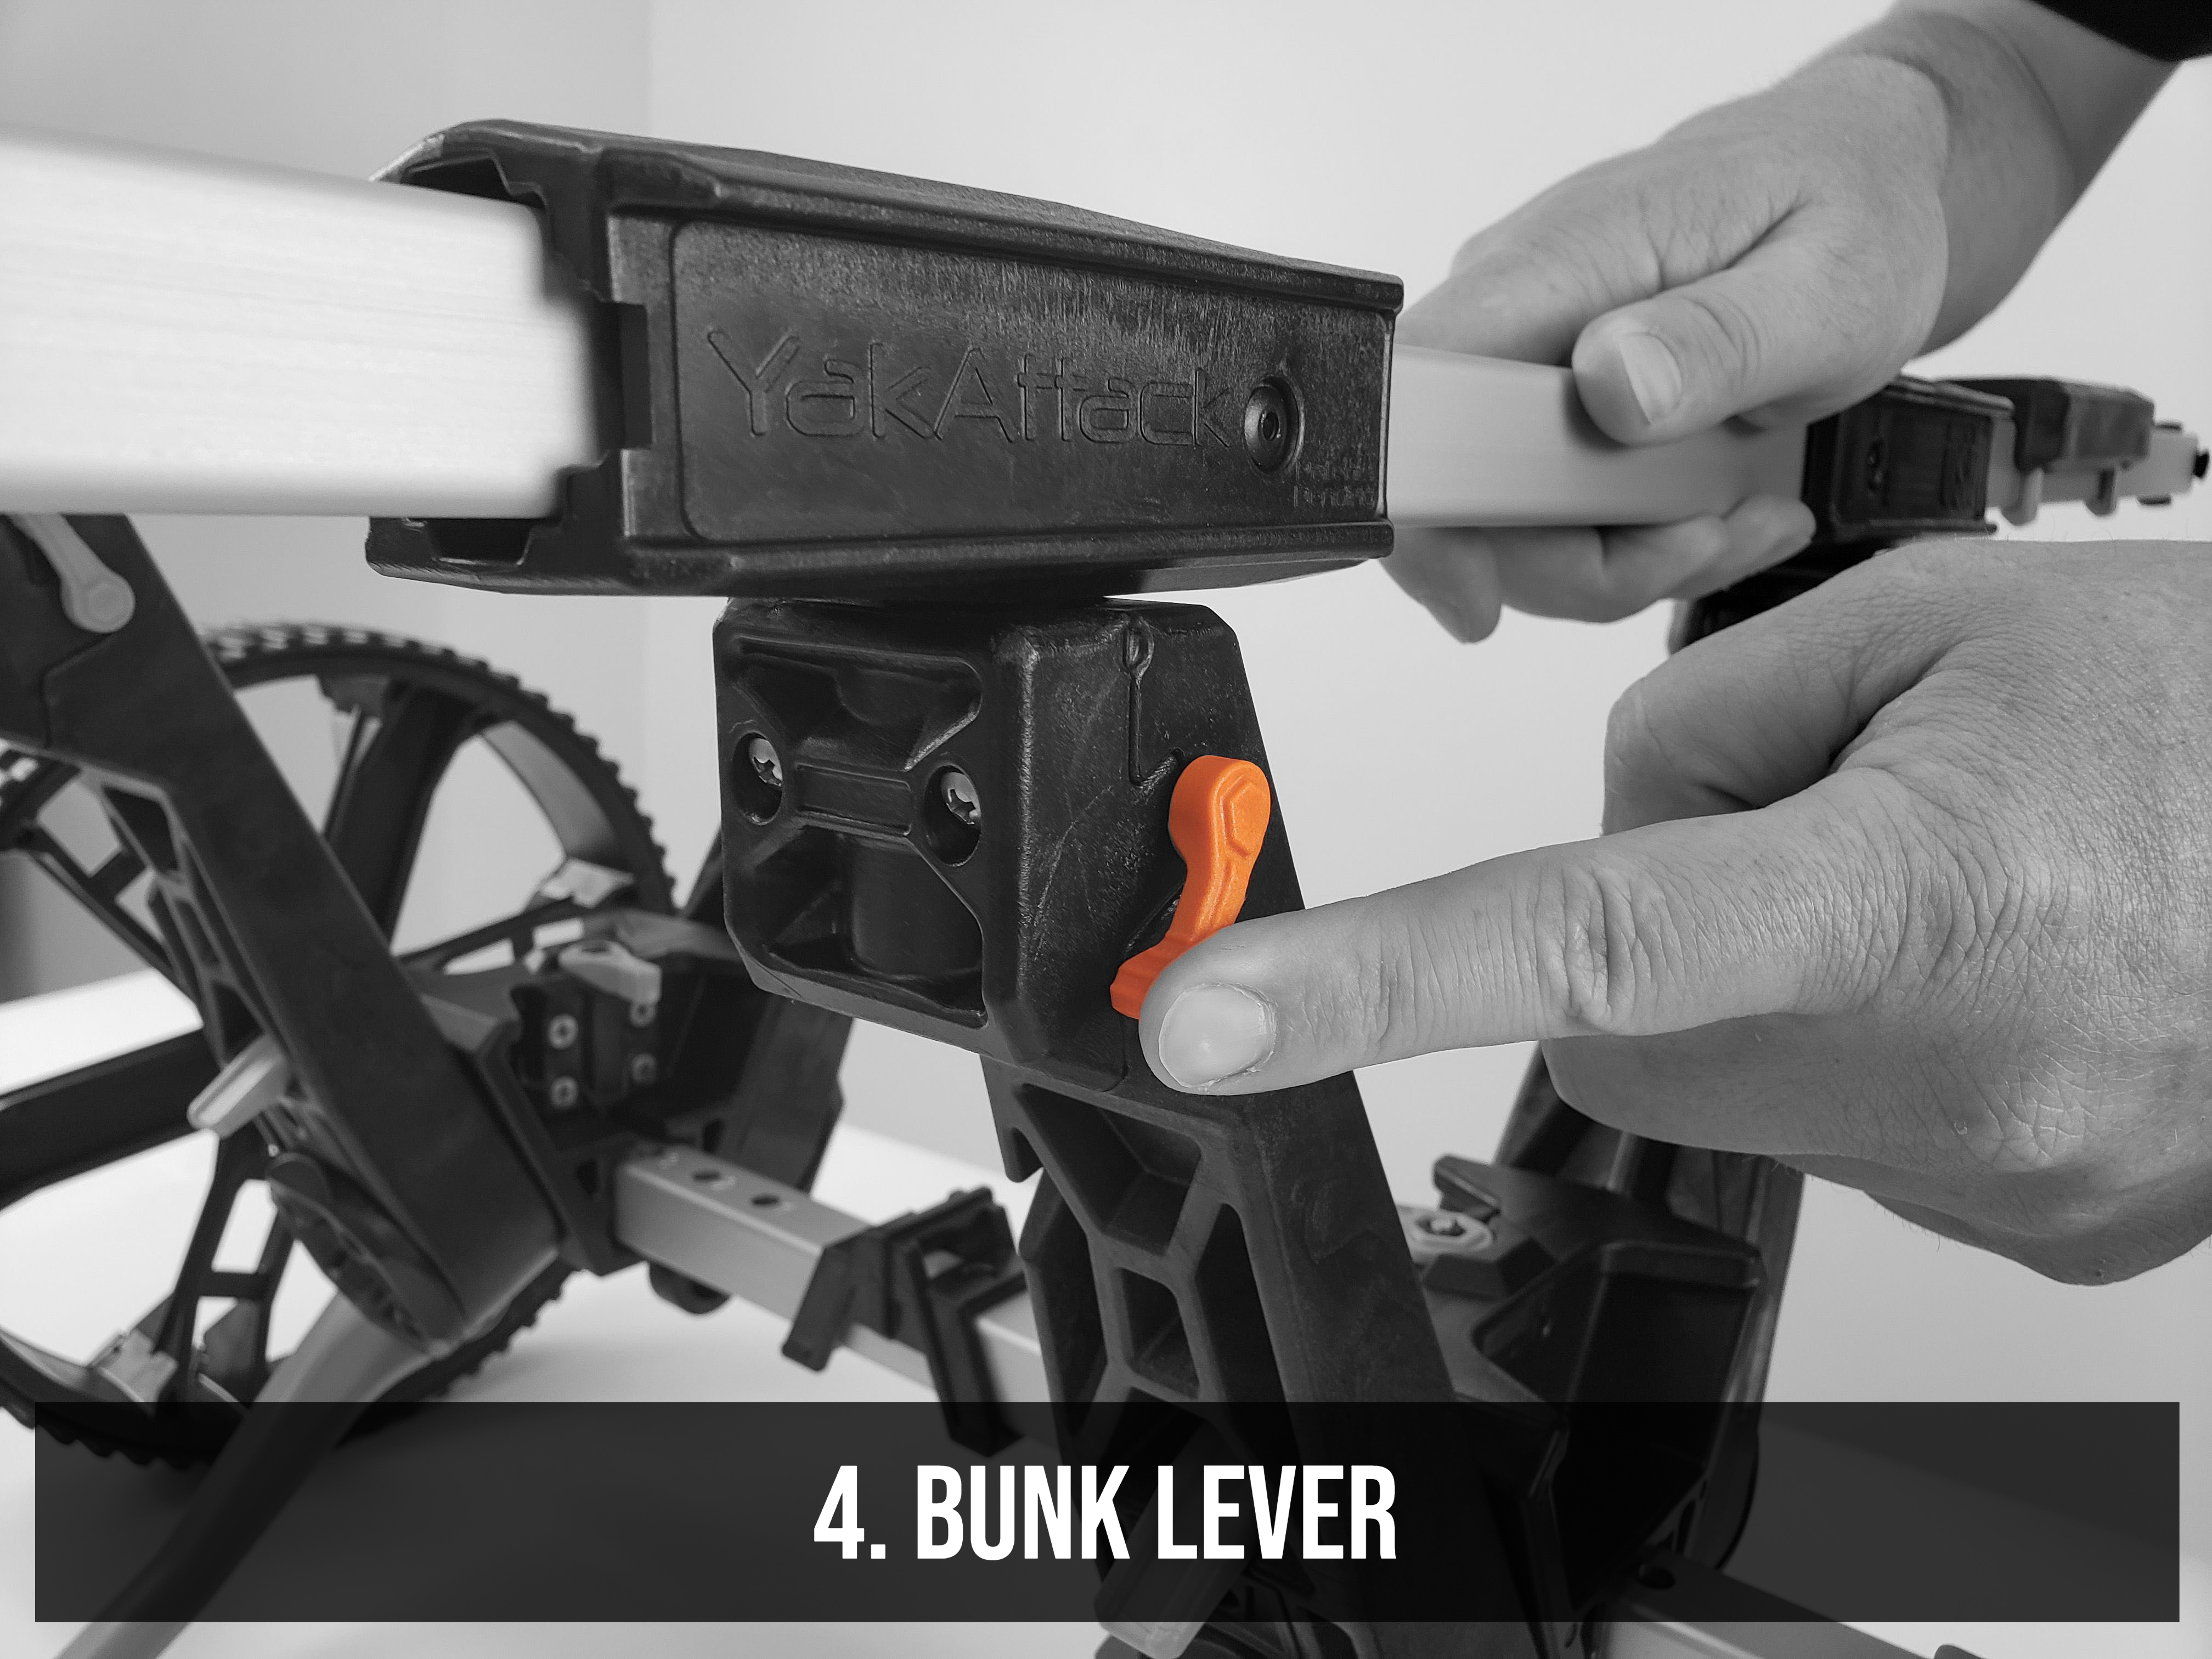
4. Attach the bunk bars. Deploy each bunk bar by unfolding the bunk extensions on each end and inserting them into the post housing, ensuring they are fully seated. When deployed, the rubber bunk pads should be facing upwards. Unlock the bunk post receiver by rotating the ORANGE Bunk Retainer Levers to the up position. Insert the bunk posts into the receivers and rotate the Bunk Levers downward to lock them in place.

To see the full kayak cart how-to and fitment guide, click the banner below
Quick Start Guide Videos
Part 1 – Intro & Wheel Installation and Removal
In this video, we start with an introduction to our TowNStow BarCart Quick Start video series. Through this series, we will take you step by step and show you how to assemble your kayak cart out of the box, starting with installing and removing the wheels.
To install the wheels on the TowNStow BarCart, line up the square hole in the wheel hub on the back of the wheel with the square end of the axle and press them on until they snap in place. If you intend to use the tie-down points on the end of the axle, make sure the slot is parallel to the axle. To remove your wheel, depress the orange button on the axle behind the wheel hub and pull.
Part 2 – The YakAttack BeadLoc WheelIn this video of our TowNStow BarCart Quick Start video series, we discuss the wheel design for the TowNStow kayak cart product line.
The YakAttack BeadLoc Wheel assembly is composed of several different parts. The 2.5-inch wide rubber tread fits over the 12-inch diameter wheel and is held in place by our BeadLoc retaining ring. The wheel features a 2-piece hub with a tie-down point on the outside, allowing you to use 1-inch cam straps to hold your kayak in place.
Part 3 – The Position Detent System
In this video of our TowNStow BarCart Quick Start video series, we discuss the Position Detent System (PDS) featured on the TowNStow kayak cart product line.
The Position Detent System refers to the mechanism that allows you to adjust the width of your upright chassis on the TowNStow kayak cart. The orange position detent lever is located on the top of the chassis. To adjust your bunk width, lift the lever or rotate it to the side, locking it in the up position. There are six hole adjustments on each side of the axle.
Part 4 – The SnapLoc Trigger
In this video of our TowNStow BarCart Quick Start video series, we discuss the SnapLoc Trigger featured on the TowNStow BarCart.
The SnapLoc Trigger is the orange trigger located on each of the four upright arms on your TowNStow BarCart. This trigger keeps the upright arm locked in place in either the deployed (up position) or the collapsed (down position). Out of the box, your BarCart will come locked in the collapsed position. Unlock the orange SnapLoc Trigger by pulling up, rotate the upright arm into the deployed position, and then press down on the SanpLoc Trigger to lock the upright in place.
Part 5 – The Kickaway Kickstand
In this video of our TowNStow BarCart Quick Start video series, we discuss the KickAway Kickstand featured on the TowNStow kayak cart product line.
The TowNStow BarCart will come with two orange kickstands located on each side of the kayak cart. The kickstands are designed to help you level the cart when loading your kayak, so you don’t have to lift as high to clear the 44-inch bunk bars. The kickstands are not designed to support the weight of the kayak once it has been loaded. When not in use, the kickstands snap into the detent molded into the upright arm.
Part 6 – Bunk Levers (Bunk Bar Removal)
In this video of our TowNStow BarCart Quick Start video series, we discuss the Bunk Levers used to secure the Bunk Bars featured on the TowNStow BarCart.
The orange Bunk Levers are located at the top of each of the four upright arms on the TowNStow BarCart. This lever is designed to lock your bunk bars in place when deployed. To install, first, make sure the bunk lever is in the upward pointing position to ensure that it is unlocked. Insert the stud on the bottom of the bunk bar into the hole on the top of the upright arm and rotate the orange bunk lever down to lock the bar in place.
Part 7 - Bunk Bar Collapsibility
In this video of our TowNStow BarCart Quick Start video series, we show you how to collapse the Bunk Bars featured on the TowNStow BarCart.
The Bunk Bars on the TowNStow BarCart were designed to be long enough to accommodate the widest kayaks on the market when deployed in the Roof Rack-Style, or perpendicular orientation. Therefore, we decided to make them collapsible so they could be easily stored inside most kayak hatches. Fully deployed, the bunk bars are just over 44 inches long but collapse to 17 inches, much like a tent pole and lock together to keep them secure when stored. To collapse the Bunk Bars from the deployed position, pull out the extensions and fold them to align them with the grove in the bunk posts. Lock the tab on the bunk cap into the bunk post to secure it.
Part 8 – Bunk OrientationIn this video of our TowNStow BarCart Quick Start video series, we discuss the two different bunk bar orientations achievable on the TowNStow BarCart.
To make the BarCart as universal as possible, it features two different bunk orientations, the "Bunk-Style" or Parallel, and "Rack-Style" or Perpendicular. The Orientation that will work best for you will depend on the shape of your kayak's hull. To change from the "Bunk-Style" orientation to the "Rack-Style" orientation, unlock the orange bunk levers and remove the bars. Making sure the chassis are in hole position #4, insert the bunk posts on the underside of the bunk bars into the top of the uprights, changing the direction the bars were previously facing.
Part 9 – Rubber Bunk Pads
In this video of our TowNStow BarCart Quick Start video series, we discuss the rubber bunk pads featured on the TowNStow BarCart.
On the TowNStow BarCart, we chose rubber bunk pads over the traditional foam padding for several reasons. Rubber bunk pads offer more compression and grip against your kayak’s hull and are not prone to dry rot like foam padding after repeated exposure to wet conditions. The four rubber bunk pads can be moved around the bunk bars to accommodate the design of your kayak.
Part 10 – Tie Down Locations
In this video of our TowNStow BarCart Quick Start video series, we discuss the integrated tie-down locations featured on the TowNStow BarCart.
To make securing your kayak to the TowNStow BarCart a simple process for all kayak styles, we integrated multiple tie-down locations into the design of this kayak cart. On the end of each wheel hub, there is a loop designed for 1” cam straps. This tie-down location is intended for kayaks that are wider than the wheelbase of the cart, which includes most fishing platform kayaks. On the center of the axle, there is another tie-down. This location works well for narrow, v-hull style kayaks. The final tie-down point is the bunk bars themselves. The bars work best as a tie-down point when they are in the “Rack-Style” orientation. We do not recommend using ratchet straps for any reason.

